How Clinicians Can Help Patients Safely Return to Running After Amputation
Equip your patients with the biomechanical training and confidence they need to safely return to running after limb loss. Implement these practical clinical strategies to optimize their gait mechanics and accelerate their active recovery.
June 14, 2026
11 min. read

When a patient asks when they're going to be able to run again—regardless of whether they are a 16-year-old track star or an 86-year-old who hasn't laced up in decades—they aren't just asking about a timeline. They are asking about their identity. As clinicians, we know that the best indicator of post-amputation success is pre-amputation function. If they did it before, they can likely do it again, though the how will inevitably change.
Readiness: Is your patient safely track-ready?
Before we even discuss a running specific prosthesis, we have to determine if the patient is physically prepared for the increase in their level of functional activity. This starts with a medical green light.
You must verify that the patient is medically cleared by their cardiopulmonary team for increased activity levels. Beyond cardiac health, surgical maturity is non-negotiable. Running is only appropriate when the skin is well-healed and resilient enough to handle the environment of a running socket.
The skin vital sign: The residual limb skin tells a story, and as the therapist, you should evaluate it before and after every session. We expect redness in pressure-tolerant areas (like the patellar tendon or medial brim), but that redness should dissipate within 20 minutes. If it persists—or if you see blisters or bleeding—it is time for prosthetic rest.
The cardiopulmonary tax: Having an amputation of a distal limb means losing a critical muscle pump that helps return blood to the heart. Because the heart must work harder to move blood through the body, patients will have an increased heart rate and respiratory rate at rest. Research shows this creates an “energetic penalty,” where the metabolic cost of movement is significantly higher than in able-bodied peers.1 Taking baseline trackside vitals is non-negotiable to ensure you are dosing exercise correctly.
The walking-to-running pipeline: If a patient cannot ambulate without significant gait deviations in their walking limb, they are not ready for a running prosthesis. Running on a walking leg is like a baseball player warming up with a weighted bat—it’s heavier and more cumbersome, but it builds the necessary trust and conditioning.
Preprosthetic conditioning: Building the engine
Patients often spend significant time sitting during the healing phase, leading to tight hip flexors and a weak posterior chain. We must wake up those glutes and hamstrings before they ever hit the pavement to prepare the body for the unique demands of prosthetic gait.
Posterior chain priority
Strengthening should focus on the posterior chain to encourage the reciprocal patterns required for running. While these can be done without the device, performing them with the prosthesis on acts as a natural weight to provide extra resistance. This is also the time to address pre-amputation function. If they were a runner before, their body already understands these patterns, and your job is simply to help them adapt that muscle memory to their new mechanics.
The cone of stability
Patients need to get comfortable being uncomfortable at the edge of their balance. Use a resistance band or sports cord at the waist (placed over the ASIS to avoid abdominal pain), and have the patient lean forward as far as they can before taking a step. This drill does more than build strength; it builds the foundational trust required to load the prosthetic “sweet spot” and accept the energy return the prosthesis was designed to provide.
Biomechanics and the “sweet spot”
A running prosthesis is a sophisticated energy-storage-and-return device. Understanding the physics of the device allows you to troubleshoot gait issues that a standard walking assessment would miss.
The trajectory of power
The limb is designed for the runner to land on a specific “sweet spot,” typically located directly under the body at mid-stance. When the runner hits this mark, their body weight compresses the carbon fiber, storing potential energy. While biological limbs can create new mechanical power through muscle activation, passive carbon fiber blades rely entirely on this compression and return.2
If the alignment is correct, this energy returns to propel the runner in a trajectory that is both up and forward. If the patient feels they are only popping straight up or just falling forward, the alignment or the landing spot is likely off.
Alignment in motion
Prioritize alignment during mid-stance over standing alignment, as the latter is largely irrelevant in a running context. Because the runner’s weight will compress the blade, the running limb is typically a half-inch to an inch taller than their walking leg.
Use your phone to capture video and slow it down for analysis. You want to see that the posterior superior iliac spine (PSIS) is even at the moment of maximum compression on the prosthetic side. While elite sprinters may prefer to be even taller to harvest more energy, pelvic symmetry during mid-stance remains the clinical gold standard for injury prevention.
Rotation changes
While we walk with about 5 degrees of external rotation, we run with our toes pointing straight ahead. Running in a limb aligned for walking can cause a lateral whip. This occurs because the hip naturally rotates inward for running, but if the prosthetic foot remains in a “toes-out” walking position, it creates unnecessary torque on the hip and residual limb.
Clinical tip: Always involve the prosthetist in these adjustments. As therapists, we identify the deviation, but the prosthetist has the tools to adjust the mount to achieve the proper trajectory.
Selecting the prosthesis: A team effort
Prosthetic feet are often available in specific weight limitations termed “categories.” Choosing a running category is a high-stakes decision because these devices are expensive and rarely covered by insurance. Because each company has its own set of categories based on patient weight, physical therapists play a key role in helping the team determine the most appropriate stiffness for the runner.
Factor | Clinical consideration |
New runners | Consider dropping down a category for a less stiff, “bouncier” feel. This allows the patient to get used to the sensation of energy return without fighting a limb that is too rigid. |
Weight goals | If a patient intends to use running for weight loss, a limb chosen for their current weight may eventually become too stiff and uncomfortable. Conversely, gaining muscle mass can increase the load on the device, potentially leading to equipment failure. |
Kids | For pediatric patients, the team must decide whether to go up a category so the child can grow into the limb and use it longer or prioritize immediate success with a softer, more manageable category. |
For patients with transfemoral amputations, the challenge is even greater. We are essentially asking them to run on a stilt with a hinge. While sprinters (100 to 200 meters) often prefer an articulating knee to mimic able-bodied patterns, endurance and long-distance runners frequently settle into a circumduction pattern using a straight pylon for better energy efficiency. Some limbs on the market offer a hybrid solution, allowing the knee to lock into extension so the patient has both options, though this adds weight to the device.
Trackside success: Building trust through drills
Once you move to the track, the focus shifts toward transitioning the patient from simply walking on a device to truly running with a limb. These drills are designed to build prosthetic trust and encourage proper weight shifts over the device.
High-yield movements
Skipping is one of the most effective ready-to-run movements in your clinical toolkit. It forces the patient to perform a powerful push-down and a small hop on the prosthetic side, which is essential for learning how to harvest energy from the prosthesis. While patients may initially feel embarrassed to skip, it provides the exact mechanical feedback necessary for prosthetic running. Other valuable trackside drills include:
High knees and mule kicks: These encourage the patient to explore the range of motion in their knee, even when limited by suspension sleeves or liners.
Cariocas and lateral bounding: These help the patient trust the lateral walls of the prosthesis and improve their balance within the socket.
Resisted running
To help a patient stay “in front” of the prosthesis, you can provide manual resistance. Stand in front of your patient and have them lean into your hands while they run forward and you move backward. This forward lean ensures the limb lands directly underneath them so the ground reaction force pushes them forward rather than backward. You can also achieve this by having the patient run while leaning into a stationary treadmill with the power off, forcing them to move the tread manually.
Auditory and musical cues
Achieving symmetry and appropriate step length is often the most difficult hurdle for new runners. You can act as a metronome by running alongside the patient and using your own feet to create a louder, consistent rhythm. Patients will often subconsciously match your cadence, which helps them settle into a natural rhythm. For independent practice, suggest musical cues or apps that sync specific BPM (beats per minute) to their target running speed.
The sweat problem: Practical troubleshooting
As your patient moves from drills to sustained running, they will encounter a physiological barrier that can undermine even the best mechanics: perspiration. The combination of increased cardiac demand and a decreased surface area for cooling creates a high volume of sweat that accumulates rapidly inside the liner. It is not uncommon for a runner to literally pour sweat out of their prosthesis after a session.
If this volume isn't managed, the limb can rotate within the socket or, in extreme cases, fly off entirely during a stride. Addressing these logistical realities early helps manage the frustration and embarrassment that often accompany a suspension failure.
Strategies to combat perspiration
To keep the patient moving safely, implement these clinical "tips and tricks" to maintain suspension and limb volume:
Hyperhydration: Paradoxically, patients need to drink more water to maintain their limb volume. As a patient runs, increased cardiac output and perspiration cause the residual limb to shrink rapidly. Hyperhydrating with water before heading to the track, rather than just sipping coffee helps to mitigate this volume loss for a more consistent prosthetic fit.
The night-before trick: Advise patients to use antiperspirants rather than just deodorant. A highly effective strategy is applying antiperspirant to the residual limb the night before a run. In the morning, they can apply a spray antiperspirant and allow it to dry before donning the liner to further decrease sweat volume. For severe cases, medical interventions like Botox, prescription-strength topicals, or laser hair removal can be discussed with the care team.
The emergency belt: Every runner should carry a kit, such as a running or hip belt, containing essential supplies. This should include an Allen wrench for loose components, car-wash towels (which are more absorbent and reusable than terrycloth) to wipe the limb during breaks, and extra prosthetic socks to fill the increased space present in the socket as the limb shrinks during the run.
The path forward: From clinical logic to community mobility
Running with a prosthesis is an evolution, not a one-time event. By focusing on clinical reasoning and these practical tips and tricks, we can keep our patients moving confidently on the track and off the sidelines.
If you are ready to deepen your expertise in this specialized field, explore my Medbridge courses designed for rehabilitation professionals:
Running With a Prosthesis: Returning to running after limb loss presents unique biomechanical, physiological, and psychological challenges. This course explores clinical decision-making, training strategies, and prosthetic considerations needed to safely initiate and progress running. You'll learn to assess readiness, implement agility drills, and manage overlooked barriers like sweat and skin tolerance.
Ambulating With Bilateral Lower Extremity Prosthetic Limbs: Rehabilitation following bilateral limb loss requires a highly individualized approach. This course equips you with strategies to evaluate and implement treatment, from comprehensive assessment to community mobility. Emphasis is placed on transfer techniques, componentry, and progressive gait training using tools like stubbies.
References
Waters, R. L., & Mulroy, S. (1999). The energy expenditure of normal and pathologic gait. Gait & Posture, 9(3), 207–231. https://pubmed.ncbi.nlm.nih.gov/10575082/
Grabowski, A. M., McGowan, C. P., McDermott, W. J., Beale, M. T., Kram, R., & Herr, H. M. (2010). Running-specific prostheses limit ground-force during sprinting. Biology Letters, 6(2), 201–204. https://pmc.ncbi.nlm.nih.gov/articles/PMC2865064/
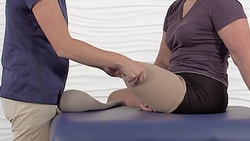
Below, watch Alicia White discuss when a patient is physically ready to run with a prosthesis in this brief clip from her Medbridge course, "Running With a Prosthesis."

Meet the Author


Subscribe to Our Newsletter
Related Posts
April 2, 2017
Three Tips to Successfully Evaluate a Patient with Limb Loss
By Alicia White

October 5, 2016
2 Keys to Better Running Form
By Jay Dicharry

May 19, 2026
Helping Patients Follow Aspiration Precautions: A 5-Pillar Framework for SLPs
By Medbridge

April 28, 2026
When Everything Feels Urgent: How OTs Decide What Matters Most in Progressive Neuro Home Care
By Krista Covell-Pierson